OpenCage Usage
Launching the GUI
After installing OpenCage as described in the installation page,
to run OpenCage, launch the program opencage.py.

This can be done in several ways, depending on your platform and file associations.

(1) Using the Terminal, cd to the directory containing opencage.py,
   and type the command
      python opencage.py
   If python is not in your your search path you may need to specify
   the full path to the pyhon exectutable here.
   If opencage.py has permissions as an executable file, just typing
      ./opencage.py
   may also work (provided the current directory includes the file).

(2) Double-clicking on the opencage.py file might work for you,
    or right-clicking on opencage.py, and selecting an option
    "Open with -> Python Launcher" or similar.

This will open a GUI which lets you configure options, and which
has usage information accessible from the menu-bar.

The program opencage-bin can also be invoked directly from the command-line,
with configuration options given as command-line flags, but we suggest
using the GUI instead. The GUI will create necessary output directories
and warn about possible over-writing of output files, whereas
opencage-bin will not.
Using the GUI for video analysis
The exact appearance of the GUI varies depending on your operating
system and in some cases on the version of Python installed, at it
used the Tkinter widgets that are part of Python. The functionality
should be similar in all cases, however. On a Windows 7 computer with
Python 2.7 the GUI looks like this:
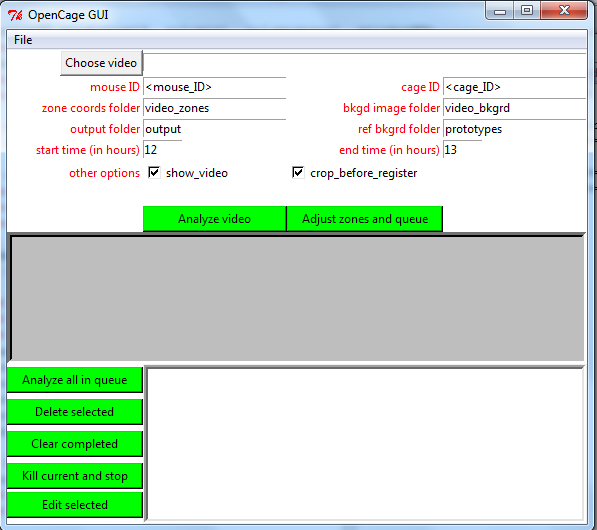
Below are brief descriptions of the components of the GUI:
- The drop-down file menu at the top left includes a quit
option and a pop-up help page. (For Mac computers this will
be in a menu bar at the top of the screen rather than attached
to the OpenCage GUI).
- The "Choose Video" button will pop up a chooser window to
be used for selecting the video to analyze. The video file
formats and particular codecs that can be analyzed depend on
compliation settings (see installation notes). Names of
all output files will be the same as the name of the video,
with the extension removed and replaced by a suffix and new
extension, e.g. with ".avi" replaced by "_zones.txt".
- The <mouse ID> field may be replaced with an identifier
for the mouse which can be used in log files. It is possible
to extract this automatically from the video names if they
have a standard format, but this is not done currently.
- The <cage ID> field is used to specify which prototype
background image and corresponding activity zones should
be used for the video analysis. In our system we had eight
cages, each with a slightly different prototype, because
the position of the camera relative to the guidelines for
where to place the cage differed slightly for each of them.
If the video names contains a substring of the form "CageN"
for an integer N this will be extracted automatically,
but can be overridden manually.
- "bkgd image folder" specifies the path to a directory
in which an estimated image of the cage with the mouse
subtracted will be saved. These images are used for
registering the cage to prototype background images of cages,
so that prototype zone coordinates can be adjusted automatically
to compensate for small differences in camera of cage position.
- "output folder" specifies the path to a directory
in which the per-frame activity scores will be written.
These are saved as text files, with one line per video
frame and one column per activity, and so can be quite
large for 24hr videos (~100MB).
- "ref bkgrd folder" specifies the path to a directory
in which prototype background images and zone cooordiantes
are kept. These may be used to define activity zones for
new videos by registering the prototype background image
with the estimated background for the new video. The zones
may be manually adjusted using either the keyboard or mouse
if necessary. For a prototype activity zone to be used,
the cage ID specified above must match the prefix of
files in this folder, e.g. cage ID "Cage1" would use the
prototype zones defined in "Cage_1_zones.txt", and the program
would attempt to refine them by registering "Cage_1_bkgrd.png"
with the background for the specified video. Users can
toggle between the raw prototype zones and the refined
prototype zones using the "w" key (for "warp"), and
manually adjust zones as desired.
- The start and end time of the portion of the
video to analyze may be specified. If left blank the
entire video will be analyzed. Note that some MPEG
video files do not include indexes that allow random
access to the specified start time, in which case
this option should not be used.
- There is a check-box indicating whether to show
the video during analysis or not. Showing in the video is useful
for checking that the mouse is tracked properly. Turning
this off makes the analysis slightly faster, and reduced
screen clutter when multiple videos are being analyzed
simultaneously.
- There is a check-box indicating whether to crop the
video frame to an area just including the cage before
registering to a prototype background. This can prevent
differences in the images surrounding the cage from
adversely affecting the registration.
- The button "Analyze video" will allow for
adjustment of the background zones, and when these
are accepted (by pressing the "s" key for "save")
the video analysis will begin immediately.
- Alternatively, the button "Adjust zones then queue"
will allow for adjustment of the background zones, and when
these are accepted (by pressing the "s" key for "save")
the video will be added to the queue at the bottom of the
GUI. Note that once queued the zones may not be adjusted
further. The idea is that a user can verify or adjust
the activity zones for many videos in a minute or two,
adding each video to the queue, then analyze all the
videos in the queue overnight or while while wandering off
to do other things.
- The grey text box in the center of the GUI is used
to display assorted diagnostics or warning messages.
- The five buttons in the lower-left control the
queued analysis jobs, which will be listed in
the scroll-list to the right of these buttons.
Post-processing
Instruction for post-processing the text files
that are output during the video analysis
are included with the source code. Included are
R scripts for summarizing activity levels for each
behavior for the entire video or across shorter
time intervals, dividing bursts of activities into
bouts, and comparing groups of mice belonging
to different classes (e.g. disease vs. control).
Known Issues
- OpenCV does not automatically detect when a video uses non-square
pixels (see http://en.wikipedia.org/wiki/Pixel_aspect_ratio).
Consequently videos with non-square pixels can appear to be too
narrow.
- For Mac OS X without FFmpeg, the Perian Quicktime add-ons
(http://perian.org/) may allow more video formats to be
decoded. However, in this case videos with non-square pixels
may appear to be skewed diagonally.
- For Mac OS X 10.6 on computers with 32-bit processors
(http://support.apple.com/kb/ht3696), FFmpeg may not compile
correctly (https://trac.macports.org/ticket/20938). Also, to
link to QuickTime on 64-bits processors, the OpenCV libraries
may have to be compiled in 32-bit mode
(http://tech.groups.yahoo.com/group/OpenCV/message/65895)/
OpenCage main page